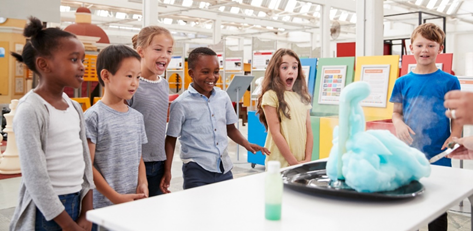
1. Fizzy Hands
You don’t need any helium to make balloon-like hands! The Fizzy Hands experiment might bubble over (literally) but it’s a terrific DIY STEM activity that can help to explain how a solid and a liquid can combine to create a gaseous substance. In this case, the baking soda and vinegar react to create carbon dioxide (CO2) bubbles. The bubbles rise to the top of the liquid, which results in foam! Watch as the Fizzy Hand expands and the foam comes oozing out!:
Materials & Supplies
- 3 tablespoons of ARM & HAMMER™ Baking Soda
- Wide mouth jar (plastic or glass)
- 3/4 cup vinegar
- Liquid dish soap
- Vinyl / Nitrile glove
- Food coloring
- Spoon
- Paperclip
- Rubber bands
- Baking sheet or tray
- Safety glasses
Method
- Lay materials out on a cookie sheet. It’s easier to clean up.
- Add vinegar, a good squeeze of dish soap, and food coloring to jar of choice. Stir with a spoon or swish to combine the ingredients. Set aside.
- (Adults only) Open up a paper clip and use a pointed end to poke a small hole in each fingertip on the glove.
- Add 3 tablespoons ARM & HAMMER™ Baking Soda to the glove, shaking it to fill the fingertips.
- Stretch and fit the open end of the glove over the top of the jar. Be careful NOT to spill any Baking Soda in. The fingers of the glove will drape over the jar.
- Place rubber bands around the base of the glove to secure it around the jar.
- Take your cookie sheet and jar/glove outside. Gently lift the glove and tip it to empty the baking soda into the jar. Swirl everything around, then stand back to steer clear of the foamy reaction!
- Bonus step: if you dare, you can add more Baking Soda and vinegar for an even bigger reaction. (You may need a *hand* for cleanup.)
The STEM Connection:
- The sodium bicarbonate (baking soda) and weak acetic acid in vinegar react and trap the carbon dioxide to form bubbles.
- The mixture of the baking soda (solid) and vinegar (liquid) creates a gas and a liquid, which in turn results in a foam (a mixture of gas and liquid, or a colloid). The carbon dioxide pushes the foam out of the holes in each finger of the glove!
2. Classic Baking Soda Volcano
The baking soda volcano is a classic from everyone’s childhood, but somehow, it’s still cool to watch every time. You probably didn’t know you were taking part in a STEM activity and witnessing science in action. Try to remember when you saw baking soda and vinegar spew out of the top of a homemade volcano and delight in watching the wonder on your kids’ faces when it happens for them for the first time.
One of the best parts about building a baking soda volcano is that you can make it erupt again and again for pennies. All you need is a bit more vinegar and baking soda.
Materials & Supplies
- 1 20 oz or 2-liter empty plastic bottle (depending on how big you want your volcano to be).
- Dough:
- 6 cups flour
- 2 cups salt
- 4 tablespoons cooking oil and 2 cups warm water
- 2 tablespoons ARM & HAMMER™ Baking Soda
- ¼ cup vinegar
- Liquid dish soap
- Water
- Red food coloring (or another color if you want non-traditional lava)
Method
- On a baking sheet (or other easily cleaned surface), tape down the plastic water/soda bottle so it doesn’t move. If you don’t have a plastic bottle, you can use a plastic cup and raise the height by stacking one upside down and one right-side up (to hold the ingredients).
- Mix your dough and form the shape of a volcano around the plastic bottle or cups. Allow to dry completely.
- Paint or decorate volcano as desired.
- Mix vinegar, dish soap, a few drops of water, and a few drops of red food coloring in a plastic cup.
- Using a funnel, add the 2 tablespoons ARM & HAMMER Baking Soda to the plastic bottle in the center of your volcano.
- Quickly pour vinegar mixture into the ARM & HAMMER Baking Soda cup in the crater. Enjoy the “lava” as the volcano erupts.
- Baking soda, aka sodium bicarbonate, is an alkaline salt. Vinegar is a weak acetic acid. When you combine them, two chemical reactions occur in a matter of seconds (a displacement and a decomposition reaction).
- The reaction produces carbon dioxide gas, which is also present in actual volcanoes.
- As the reaction continues, carbon dioxide bubbles gather around the dish detergent (which contains surfactants that attract the gas to it) until bigger and bigger bubbles form) and pressure builds, then the "lava” bubbles out of the mouth of the volcano.
Note: for a fun variation at the beach or in a sandbox, bury a plastic cup in the sand and make a volcano shape. Then add your baking soda and vinegar as above.
The STEM Connection:
3. Bottle Rocket
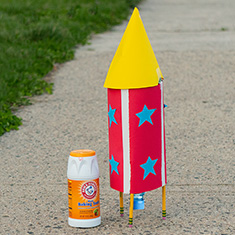
Another fun STEM activity you can do is a DIY bottle rocket (it’s literally made from a plastic bottle). The baking soda and vinegar reaction we explored in the volcano experiment is so powerful that the energy produced can power a rocket! While you won’t get to the moon with a carbon-dioxide powered rocket, you can still watch as your homemade rocket reaches for the sky (then falls with style).
You need to head outside for your rocket to lift off, so make sure you choose a day with good weather for this experiment. Turn it into a STEM challenge by having each child, or team of kids, make their own rocket and see whose travels the farthest or lifts off the fastest.
Materials & Supplies
- Safety glasses
- 1 empty 2-liter soda bottle
- 3 tablespoons ARM & HAMMER™ Baking Soda
- 2-3 cups vinegar
- Measuring cups and measuring spoons
- Duct tape
- 3 pencils
- Construction paper to decorate rocket
- One cork (make sure it will fit mouth of soda bottle)
- Paper towels
- Stopwatch
Method
- Use duct tape to secure pencils to the bottle in a triangle-shaped pattern as the “feet” of the rocket.
- Decorate the outside of the bottle with construction paper and markers.
- Fill the empty bottle about halfway with vinegar.
- Take the bottle outside.
- Add 3 tablespoons of ARM & HAMMER Baking Soda onto a single square of paper towel.
- Roll up the paper towel tightly to fit inside bottle to help prevent the baking soda from spilling out.
- Place the paper towel full of baking soda inside the bottle and plug it with the cork. (Do not plug too tightly, but don’t allow any liquid to spill out.)
- Turn the bottle upside down, place on its ’feet’ and STAND BACK!
- Watch as the rocket soars into the sky. Time how long it takes until lift off and predict how high it will go or how far away it will land.
The STEM Connection:
The rocket takes off into the sky due to pressure building inside it from the carbon dioxide gas released in the baking soda-vinegar reaction. Since you corked the bottle, the pressure builds until it pushes the cork out and the resulting force propels the rocket into the sky. The equation is Pressure = Force / Area.
- Time how long it takes after turning the rocket upside down for it to launch. Does this happen faster or slower if you increase the baking soda? Increase the vinegar?
- Try the experiment using a 20 oz bottle instead of a 2-liter. How does this affect how quickly the rocket launches? Does the smaller bottle have more area, or less?
- Experiment with using construction paper, cardstock, or cardboard to create a nosecone and/or fins for your rocket. Do these additions cause the rocket to fly higher? Straighter?
4. Ping Pong Ball Races
It’s a race! You’ve probably seen the carnival game where you squirt a water gun at a target and cause your balloon to rise or your rabbit to race forward. This fun STEM activity simulates that race, but with the power of the baking soda and vinegar reaction to propel ping pong balls through tubes. Whose ball will rise to the top first?.
In the directions below, we suggest two tubes for a two-ball race, but you can cut more tubes to allow for a three- or four- or more-way competition, giving each kid their own ball. Extend this activity with some STEM-related challenges and scientific hypothesis below.
Materials & Supplies
- ARM & HAMMER™ Baking Soda
- 2" Clear Plastic PVC Vinyl Tubing (found in the plumbing section of your local hardware store or online). Cut into two 3’ lengths with a hacksaw (or ask them to cut it for you at the store)
- Duct Tape
- 2 cups of Vinegar
- 1/2 cup Liquid Dish Soap
- Ping Pong Balls
Method
- Duct Tape the bottom of each tube to make it watertight
- Stand tubes on a flat surface
- Add 1/3 cup ARM & HAMMER™ Baking Soda to the bottom of each tube
- Drop ping pong balls into each tube
- Make a mixture of 2 cups vinegar with 1/2 cup liquid dish soap
- Pour mixture down the side of tubes (KEEP FACE AWAY FROM THE TUBES TO AVOID BEING SPLASHED AND WEAR PROTECTIVE GOGGLES)
- Watch as the ping pong balls rise to the top of the tube. Which one will win?
STEM Connections:
- How Fast Does the Ball Rise?
- Use a timer to calculate how long it takes for the ping pong ball to reach the top.
- Repeat the experiment and time again.
- Do this 3 times to see if you get the same result each time. Why or why not? What might be causing the variation?
- Try adding more or using less Baking Soda or Vinegar
- Increase the baking soda to ½ a cup vs 1/3 cup and repeat. Does the ball reach the top faster or slower? Why?
- Decrease the baking soda from 1/3 cup to ¼ and repeat.
- Decrease the vinegar from 2 cups to 1 cup and repeat.
- Make the ball heavier
- Wrap a piece of clear tape around one of the ping pong balls and repeat. Does this heavier ball reach the top faster or slower? Why?
- Distance equals rate multiplied by time (d=rt)
- Use the classic physics equation Distance = Rate x Time and solve for Rate to determine how fast the balls are moving. (You know the length of the tube and you’ll have the time from step 1).
5. Dancing Popcorn

If you’re looking for a corn-y STEM activity for the fall, how about sprucing up the family harvest by making corn kernels dance around? The popcorn kernels are a great model to showcase the reaction between baking soda and vinegar and to talk about density. Their composition allows the carbon dioxide gas formed from the reaction to lift them to the surface and return them back to the bottom, turning popcorn into hop-corn.
While you’re waiting for the nutcrackers to come to life and dance on ice in the winter, try making corn kernels dance in autumn with this easy DIY STEM fun.
Materials & Supplies
- ARM & HAMMER™ Baking Soda
- Mason jar
- ¼ cup dry popcorn kernels
- Vinegar
- Stopwatch
Method
- Fill mason jar halfway with vinegar.
- Insert popcorn kernels so that they layer the bottom of each jar.
- Add 2 tablespoons of baking soda to the jar.
- Stir the kernels to get them dancing.
- Watch as the kernels bounce around.
- Optional: use the stopwatch to time how long it takes for the first kernel to rise and how long it takes for the kernels to stop moving.
The STEM Connection:
- The vinegar and baking soda create carbon dioxide gas bubbles that get trapped in the bottom layer of the jar.
- Popcorn kernels are light enough to sink in the water, but not so heavy that they cannot be lifted by the bubbles.
- The gas bubbles lift the kernels. When the gas is released when the bubbles pop at the surface, the kernels fall back to the bottom of the jar.
- Extended STEM experiments:
- Try using different items besides popcorn kernels and see if the carbon dioxide bubbles can lift them. Predict whether you think they have the right density to dance! Examples to try:
- Grains of rice
- Raisins
- Lentils
6. Making Crystals with Baking Soda
Baking soda can form crystals because it is a crystalline solid. A crystalline solid you probably already know and love is the salt you put on your French fries! Table salt (NaCl) and baking soda (NaHCO₃) both have sodium in their chemical formulas, so they have similar characteristics. Thanks to baking soda’s sodium crystalline structure, we can make our own crystals at home with just a few household items!
Materials & Supplies
- ARM & HAMMER™ Baking Soda
- Glasses or jars (at least two)
- Spoon
- Steel nails (2). These need to be heavy enough to sink to the bottom of the jar
- Hot tap water
- Piece of yarn or cotton string, about 6 in. long
Method
- Place the 2 glasses or jars across from each other, leaving space between them.
- Fill each glass with hot tap water. Add 2 tablespoons of ARM & HAMMER Baking Soda to each glass and stir.
- If all the Baking Soda dissolves, add more Baking Soda until the water cannot dissolve it anymore, indicating that the mixture is saturated.
- Add a few drops of food coloring if you’d like your crystals to be colorful.
- Tie a nail to each end of the string/yarn and drop 1 nail into each glass. Let the string dangle a bit (like a smiley shape) between the glasses but not so much that the string touches the ground.
- Watch the string over the next few days. As the water evaporates, colorful crystals will begin to form along the string.
The STEM Connection:
- The water holds as much of the baking soda as it can until it becomes supersaturated, with the leftover salt leading to the creation of a solid. In this case, crystals!
- This is because the sodium and chloride ions that are left behind attract each other, bond, and materialize as crystals! How sweet (or salty) is that?
- Repeat this activity using regular table salt in one pair of jars, and sugar in another. Compare the crystal size and structure of each! Do crystals form faster for baking soda, table salt, or sugar?
7. Invisible Ink
The combination of baking soda and vinegar doesn’t just serve up explosive reactions. It can also leave traces! Ever wanted to play the part of an explorer who stumbles across a secret message? The Invisible Ink STEM activity allows you to do just that. Your baking soda and water "ink” will be invisible at first, then change color when introduced to heat. Using purple grape juice will produce other colors, as well! You don’t have to write words or letters either, so your preschooler can scribble away and still get a big payoff!
You might not be dusting off ancient artifacts, but this simple DIY STEM activity can still unlock your inner Indiana Jones or Nic Cage.
Materials & Supplies
- ARM & HAMMER™ Baking Soda
- Paper
- Water
- Light bulb or other heat source
- Paintbrush or swab
- Measuring cup
- Purple grape juice (optional)
Method
- Mix equal parts water and baking soda together in a cup or small container.
- Try a cotton swab, toothpick, or paintbrush as a utensil to write a message (or draw a picture) on your sheet of paper, using the baking soda solution as "ink."
- Allow the ink to dry. The paper will look blank, but you know there’s a message on it!
- Read the message by holding the paper up to a heat source, such as a light bulb (do not use a halogen bulb) or a hair dryer. The heat should turn the baking soda in the lettering brown, so you can read it.
- Alternatively, you can paint over the paper with purple grape juice, which should yield a different color and make the secret message visible!
The STEM Connection:
- The introduction of a heat source reacts with the water and baking soda mix to reveal written messages, symbols or images.
- If using grape juice, the baking soda and grape juice make for an acid-base reaction, with the grape juice (acid) serving as a pH indicator for the sodium bicarbonate, or baking soda (base).
More Fun Family Activities with Baking Soda
Want more fun things to do with your kids and baking soda? Check out these other ideas from ARM & HAMMER™: